
The traditional bridal bouquet is the most photographed item of the entire wedding. Remember that the bridal bouquet should coordinate with the bridal gown and reflect the brides personality in some way. Just so everyone knows, I personally do not like to design a bridal bouquet without meeting the bride first hand. The modern version of the traditional bridal bouquet is often decorated with fabric from the wedding gown, pearls, beads or diamonte but it’s always wise to ask the bride about her personal tastes before adding any of these items. Note that many people in Italy believe that pearls bring tears. You don’t want to be the one to provoke tears on the brides wedding day.
Ever wonder why traditional bridal bouquets cost so much. The answer is really very simple. A traditional bouquet requires high quality flowers, materials, time, know-how and skill. The price of a simple bridal bouquet begins at about 125 euro. The price will go up based on the type of flowers, time of year and the “Bling” that is added to the bouquet.

Note I always start with double the amount of flowers that I expect to use for my bouquet. I carefully select each flower by examining the condition of each bud. Knowing that each flower will be photographed close up and needs to last all day I want to make sure that I start with the best possible. I then condition all my flower s in a solution of floral preservative and water for a few hours. This will further ensure that the bouquet will look it’s best all through the day.
Next I assemble my wire and floral tape for the type of flowers I plan to use.


Wiring
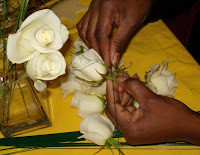
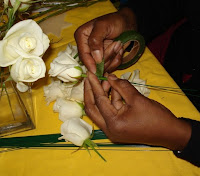
Traditional bouquets are wired in order to create a bouquet with many flowers yet keep the handle small and light. The trickiest part of a bridal bouquet is the wiring. You must wire each flower, greenery and accessory that will be included in the finished product. The technique for wiring is slightly different based on the type of flower. The bouquet I created today it was fairly simple because I used small cream and white roses, gypsophilla and pidosforo. After inserting the wire, floral tape is used to cover the length of the wire stem. Floral tape is tricky to learn to use. It must be pulled lightly as you wind it around the wire stem. Within the floral tape is a glue that is released in this pulling. This glue helps to keep all the wires together when you begin to assemble.

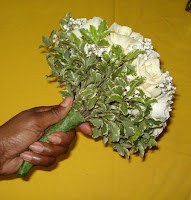
Assembling
Use a wide floral tape to hold all the stems together as you assemble the bouquet. The bouquet is assembled as you would a normal bouquet using the spiral technique and taping as you go so the flowers donot move around.

Finishing
Although floral tape is very useful it is not pretty to look at. Many people who have not learned to create a bridal bouquet will deliver the bouquet to the bride with this floral tape in view. Do not accept a bouquet in this manner. During the day this tape will become sticky from the heat of your hand and that’s just not fun. I always ask the bride for a piece of the bridal gown to cover the handle but any beautiful ribbon will be fine. It’s the finishing touch that separates the designer from the novice.
Let me know if you want to give it a try. I'll help you out.
Debra
